
|
In the heart of every manufacturing enterprise lies a story waiting to be told. Beyond the hum of machines and the precision of processes, there's a narrative that connects with clients, partners, and stakeholders. This narrative, often overlooked, is a powerful tool that can be harnessed through the lens of commercial photography. The Tale of Craftsmanship Consider this: a series of expertly captured images that showcase the intricate details of your manufacturing process. From the skilled hands shaping raw materials to the state-of-the-art machinery in action, each photograph tells the tale of craftsmanship that sets your business apart. These visuals not only elevate the perceived value of your products but also demonstrate the commitment to quality that defines your brand. Building Bridges with Clients Establishing and nurturing client relationships is paramount for any manufacturer that wishes to grow. Professional photography provides a unique opportunity to bridge the gap between your clients and your production facilities. Imagine the impact of sharing a visually compelling story of how their orders are meticulously handled, assuring them of the dedication and precision that goes into every product. Cultivating a Culture of Excellence Every manufacturing facility has a culture, a set of values that guide its operations. Photography becomes the silent storyteller of this culture, capturing moments that reflect the dedication, teamwork, and innovation within your organization. These images, when strategically incorporated into your branding, become a visual representation of the excellence embedded in the very fabric of your business. Visual Consistency: A Branding Symphony Consistency is the backbone of effective branding. Through professional photography, you can orchestrate a symphony of visuals that harmonize across your marketing channels. From your website to promotional materials, this consistency reinforces your brand identity. Potential clients encountering your brand will find a narrative that resonates, creating a lasting impression that goes beyond the products you manufacture. Navigating the Digital Landscape In today's digital era, the battle for attention is waged on screens. Investing in high-quality commercial photography equips your business with a powerful arsenal to navigate this landscape. Striking visuals capture the interest of your online audience, prompting them to delve deeper into your story. Whether on social media, your website, or marketing campaigns, these images cut through the noise and leave a lasting imprint. The ROI Equation: Beyond Numbers While the impact of commercial photography is undeniable, measuring its return on investment goes beyond mere numbers. It's about cultivating an image that translates into increased client trust, strengthened relationships, and enhanced brand loyalty. These intangible benefits eventually manifest as increased profits, as clients are not just buying products; they're investing in the story, the culture, and the values your brand represents. In conclusion, the investment in commercial photography is not just a line item in the budget; it's a strategic move to weave a compelling narrative that resonates with your audience. By bringing your manufacturing story to life through visuals, you're not only boosting your brand but also laying the groundwork for sustained profitability. It's a journey that begins with a click of the shutter and ends with a visual story that echoes in the minds of your clients, creating a narrative that transcends the tangible and drives your business towards greater success. 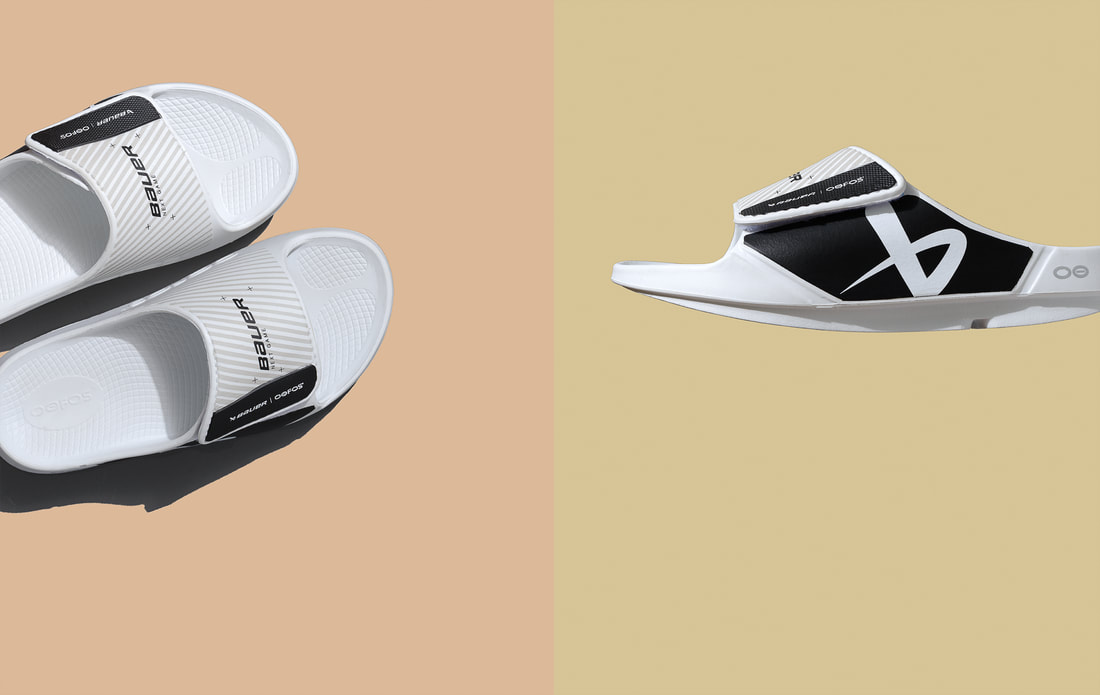 Capturing Corporate Excellence: The Impact of Professional Photography on Business Branding1/18/2024
In the fast-paced and visually driven world of business, the first impression is often the only impression. As companies strive to stand out in crowded markets, the role of professional photography in shaping a brand's identity has never been more crucial. Beyond simply showcasing products or services, commercial photography has the power to capture the essence of corporate excellence, leaving a lasting impact on clients and customers alike. Visual Storytelling: A Gateway to Corporate Identity Imagine your business as a story waiting to be told. Professional photographers excel in weaving visual narratives that go beyond mere snapshots. They have the ability to portray the values, culture, and unique selling points of your company through carefully crafted images. These visuals become a language that resonates with your audience, providing them with a glimpse into the heart of your corporate identity. Building Trust and Credibility In the corporate world, trust is the cornerstone of successful partnerships. High-quality, professionally taken photographs lend an air of authenticity to your brand. Clients and customers are more likely to trust a business that invests in visually appealing content. Whether it's showcasing your team, premises, or the behind-the-scenes processes, professional photography creates a transparent and trustworthy image that fosters stronger connections with your audience. Setting the Tone: Consistency in Branding Consistency is key in branding, and professional photography plays a pivotal role in maintaining that consistency across various platforms. Whether on your website, social media profiles, or marketing materials, cohesive visuals create a unified brand image. This uniformity not only reinforces brand recall but also establishes a sense of professionalism and reliability. Standing Out in the Digital Landscape In an era dominated by digital content, businesses are constantly vying for attention online. Professionally captured photographs have the ability to cut through the digital noise, making your brand instantly recognizable. High-resolution images that are visually striking not only grab attention but also encourage engagement. As users scroll through countless posts and advertisements, captivating visuals can be the difference between being noticed or overlooked. Investing in Long-Term Success While it may be tempting to cut costs, investing in professional photography is an investment in the long-term success of your business. Quality images have a timeless appeal and can be reused across various marketing campaigns, saving both time and resources in the long run. In conclusion, the impact of professional photography on business branding is undeniable. It goes beyond aesthetics, playing a fundamental role in shaping how your company is perceived. By investing in capturing corporate excellence through photography, you're not just creating images; you're crafting a visual identity that resonates with your audience, fosters trust, and propels your brand towards lasting success.  I asked AI to write an article that compares the differences between the lenses of cameras vs mobile phones, and this is what it came up with in less than 30 seconds. It's very through, except for completely missing any mention of technical lenses for architecture, product or aerial photography.
Camera lenses and mobile phone lenses share some similarities, but there are also key differences in terms of design, construction, and functionality. Here are some technical differences between the two:
I suppose dear reader, you could take this in more than one way. For example, since I make images almost every day, editing is paramount to strengthening my portfolio. When I pull images out of the line up, I do it because they don't blend with the overall aesthetic of what I'm presenting to the world, even though at the time I made them they may have. I pull certain images in order to strengthen instead of dilute my message. Every now and then, I look through my website from the point of view of a newcomer and ask myself, "does my portfolio make sense?". "Is what I'm seeing a coherent message or is the message a jumble of disassociated individual images". A jumble of images makes for a weak and unmemorable experience for the viewer. This is where editing and culling poor images becomes important. If you are talking metaphorically, one could edit their circle of influence, their relationships with people they commonly associate with. As the saying goes, you are the average of the 5 people you spend the most time with. I may have the number skewed a tad, but you get my point. If those 5 people are low energy, lethargic and always bring you down, you would do better to edit your crowd in order to improve your chances of happiness and prosperity. Editing is a good thing and should be taken on without hesitation. Thinking of reducing your crowd of influence should never be thought of as a negative action. On the contrary, doing an inventory and analysis of what improves and what degrades your life is an essential skill. You may even go as far as to conduct an 80/20 analysis to home in on what exactly is making your life better, and what is simply draining your resources. As a photographer, I take editing quite seriously. One substandard image may be the only thing a portfolio is remembered for in a sea of gems. It only takes one sour candy to ruin a delicious cheesecake. Never be afraid to edit. You'll be stronger for it in the long run.  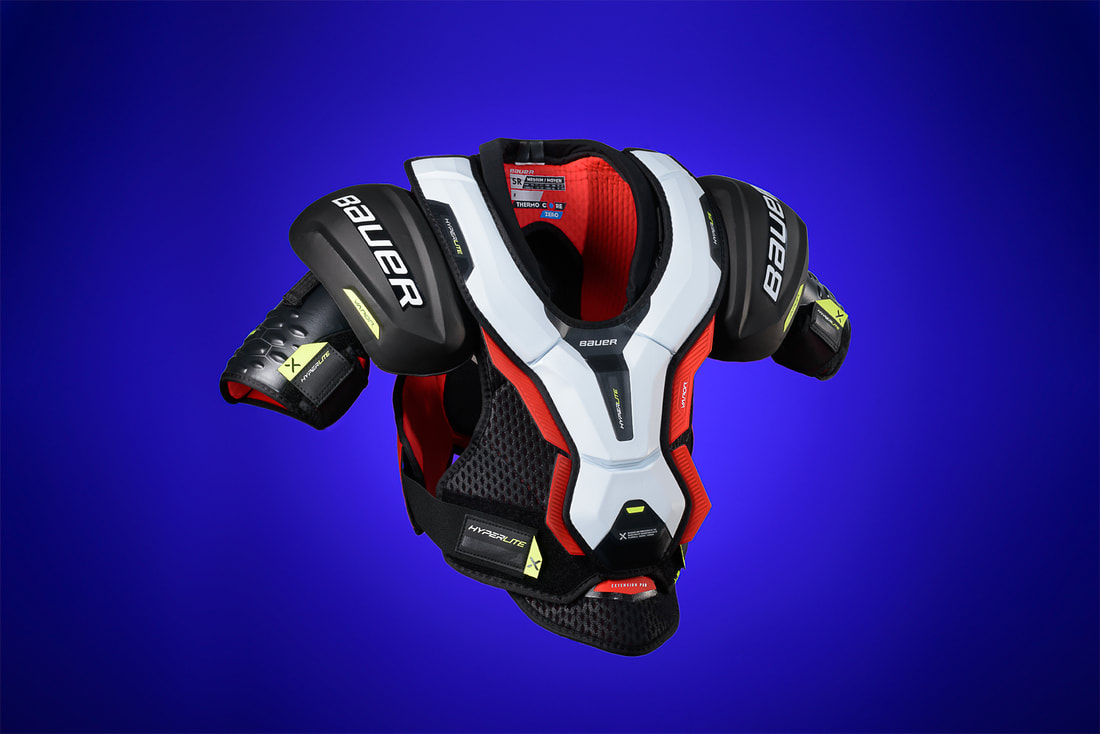 Making a cool image out of a collection of bits and pieces is sometimes the name of the game. Even if I'm doing it solely for my own uses.
My portfolio consists of a number of personal projects that give me the opportunity to build my skills as a problem solver as well as a creative photographer. Each shot has its challenges. Technical and creative. Recently I took on the challenge of shooting this protective hockey equipment, not knowing how I was going to achieve my goal. Each job as I said, has its challenges. With experience comes knowledge and confidence. Each successive project build on the knowledge of the previous and gives one the ability to work faster and with more confidence. I think that applies to more than just the photography world. As we slip into a new year, I'm looking forward to getting my hands dirty with a new genre of product shooting. Let's see what I can achieve with even more challenges. Near the end of 2023 I came to the realization that I don't do enough testing and experimenting in my photography. Previous to this, I spent 2 years attempting to improve my photography of wine and beer products. The idea was to show off my skills to those who make such goodness, with the goal of getting hired. It worked. To a point. I did take on 2 clients. One more so than the other. I shot all of their products for their new website. They were quite happy and I was paid well for the service. As time went on, I was doing less and less wine and spending more time looking at different subject matter of which to test my skills and build my portfolio. Eventually, I wasn't doing any wine shoots at all. They had all they needed from me. The well had dried up. A few different clients did come along, but nothing that I would call a steady workflow. This is where the experimenting comes in. I looked at my situation and knew that a change was in order, so I started trying to shoot at least 2 new objects each week for a month and a half. Since I had a connection with the local sporting goods store, (down the street) I started shooting some of their products. My skills have grown again, as has my portfolio and my online presence. I felt refreshed and invigorated again. This is why I do this. Shooting product feels "right" to me. Sure, I could do portraits. But it's not the same as spending hours planning a shoot for a product and going through the process of making it all come together. On my own. I've no crew or assistants or in-house technicians. It's just me. If the shoot flops, it's on me. If the retouching is shoddy and people wince at my photo, it's on me. I experiment with shooting a variety of products because it feeds my need to shoot images and make art. I feels "right". This is why I do it. Oh, and it pays well. Another good reason to always be testing and experimenting. Enough said.  I'll be the first to admit that when it comes to planning out my life with a goal of being successful, I often drop the ball. Taking the time to look to the future, and make the necessary steps to make sure I reach some lofty goal is definitely not my strong suite.
I did however get through college just fine. In fact, I graduated with Honours grades. No mean feat considering that 100 people started and less than 30 graduated. Moreover, the last semester for me started on crutches as I broke my ankle the first day back after spring break. There were two of us cripples in the same class, both with purple casts. We hobbled around the campus, doing our best to carry our huge camera equipment. But I digress. Planning out a strategy has never been my strong suit, unless it had something to do with cycling or photography. Back in the '80s and '90s I was heavily into long distance cycling. Usually between Toronto and Woodstock, or landmarks beyond. Everything was fine for the most part, except for that one time that I teamed up with a workmate for one adventure. He just had to utter those interminable words: "I sure hope I don't get a flat". That S.O.B ! Wouldn't you know it. That would be the one and only time that a mechanical difficulty ruined the entire adventure, and not in a good way. Fast forward to the past 10 years or so, and I'm more a photographer than a cyclist. As such, I take great pride in my ability to envision what I need to achieve, and just know how I'm going to get there. Looking at a product from an artists perspective, or rather from a prospective buyer's perspective, gives me the ability to generate the final results in my head in no time flat. From there, I know that I need to work out the mechanics of photographing the product with a minimal of effort and time expenditure. Planning. Sometimes I put it to use and sometimes I just suck at it. There. I said it. Oh, by the way, I started a Youtube channel where I post short vids that get to the point regarding techniques I use in photography and retouching. My goal is to make videos that are helpful to a small group of photographers who can do without all the big production videos. People who just like to get to the point. You can find it here: https://www.youtube.com/@MikeTaylorPhotoArts  In the dynamic landscape of commercial ventures, the ability to convey a message effectively is paramount. As businesses strive to capture the attention of their target audience, the value of creative expression in crafting captivating images cannot be overstated. Visual communication has evolved into a potent tool, with businesses harnessing the power of artistic expression to enhance their brand identity and engage consumers on a deeper level.
One of the key benefits of incorporating creative expression into commercial projects is the unique visual narrative it can offer. A well-crafted image can tell a story, evoke emotions, and create a lasting impression. In a sea of competition, businesses that invest in visually striking content gain a distinct advantage. Whether it's a vibrant product display, an imaginative advertisement, or an eye-catching social media post, the ability to stand out and leave a lasting impact is crucial in today's crowded market. Moreover, creative expression allows businesses to communicate their values and ethos in a visually compelling manner. Through the careful selection of colours, shapes, and imagery, companies can convey messages that resonate with their target audience. This authenticity fosters a stronger connection between the brand and the consumer, leading to increased brand loyalty and customer trust. In the digital age, where attention spans are short, the visual appeal of content plays a pivotal role. Creative expression serves as a tool to grab attention instantly and communicate messages efficiently. Whether it's a sleek website design, an attention-grabbing social media post, or an aesthetically pleasing product catalog, the visual elements of a commercial project serve as the first point of contact with the audience. Making this encounter memorable is a key factor in building a positive and lasting impression. Furthermore, creative expression fosters innovation. By encouraging a culture of experimentation and artistic exploration, businesses can discover novel ways to present their products or services. This constant evolution not only keeps the brand fresh and relevant but also positions it as a trendsetter in the industry. In conclusion, the incorporation of creative expression into commercial projects is not merely a trend but a strategic necessity. It adds depth, authenticity, and memorability to a brand's identity, enabling businesses to connect with their audience on a more profound level. As the visual landscape continues to evolve, those who harness the power of creative expression will undoubtedly find themselves at the forefront of success in the competitive world of commerce. Putting together an image that I think will capture the attention of the viewer, isn't always a simple process. Sometimes it takes a great deal of thought. Even taking a few days of thought so I can allow my ideas to enter my brain, get churned up with other unrelated ideas, and then get set aside or dismissed. I saw this hockey goalie helmet the other day and knew that I had to photograph it. It's got that ominous appearance that requires a moment to take in. I wanted to light it in a way to express how I felt personally about the object. I knew it had to be backlit to show the general shape while leaving the centre of the helmet darker. In this way, the object would present as scary. Like walking down a street at night, passing an alleyway that is almost black with lack of street lighting. That sort of "I wonder what is lurking down there" appearance. Before I photographed the helmet, I did some searching for smoke photographed against a black background. Finding a few images available freely on Creative Commons at Unsplash.com, I played with the smoke images until I found a pleasing arrangement. Then, time to shoot the hero. The key was the back lighting. This set the mood for the image. I had to base all my additional lighting on that. After shooting, I pulled the helmet images into software and worked with the smoke and helmet together. Sometimes, this takes just a few moments. And others, it takes hours or days. This time it took the latter. About 3 hours from start to finish. The helmet was the only element I had to photograph. The helmet is the hero of the shot and the smoke is the supporting cast. Interesting is that I envisioned this as a horizontal image, but after establishing the look with the smoke and helmet combined, I knew that a vertical would be more suitable. As a horizontal, the image was clearly about the smoke. As a vertical, the image was decidedly about the helmet. The image came together well. I'm totally satisfied and feel that all the effort was well justified. Photographers rarely shoot a product "as is" unless they are shooting for an ecommerce production. Most of my images are photographed in parts and assembled to give an end product to suit a need. Most of it is real. Sometimes, it takes a lot of work to make it look "real".  Revolutionizing Business Promotion: VEED.io's Fast and Easy Video Creation for Social Media Success12/19/2023
In the fast-paced digital era, businesses are continually seeking innovative ways to capture the attention of their target audience and promote their products or services effectively. Social media has become an indispensable tool for brand promotion, and creating engaging video content is key to standing out in the crowd. One platform that has emerged as a game-changer in the world of video creation is VEED.io. This online video editing tool is hailed as the fastest and easiest way for businesses to produce professional-quality videos, helping them save money and stay ahead in the competitive landscape.
The Need for Dynamic Video ContentIn an age where information is consumed at an unprecedented rate, businesses must adapt their marketing strategies to keep up with evolving consumer preferences. Video content has proven to be highly effective in capturing and retaining audience attention. According to recent studies, social media posts with videos receive significantly higher engagement than those without. As a result, businesses are increasingly turning to video marketing as an integral part of their promotional efforts. VEED.io: A Revolutionary Video Editing PlatformVEED.io has emerged as a revolutionary platform, addressing the challenges businesses face in creating professional-quality videos for social media. What sets VEED.io apart is its commitment to simplicity without compromising on the sophistication required for high-quality video production. 1. User-Friendly InterfaceOne of VEED.io's standout features is its user-friendly interface. The platform is designed to be intuitive, allowing even those with limited video editing experience to create compelling content effortlessly. Users can access a wide range of tools and features without the need for extensive training, making VEED.io accessible to businesses of all sizes. 2. Speed and EfficiencyTime is of the essence in the digital landscape, and VEED.io recognizes this. The platform boasts remarkable speed, allowing users to create professional-quality videos in a fraction of the time it would take with traditional editing tools. This efficiency is particularly crucial for businesses looking to maintain a consistent and timely presence on social media platforms. 3. Cost-Effective SolutionTraditional video production can be costly, requiring specialized equipment, software, and often, professional expertise. VEED.io eliminates the need for extensive investments by providing an affordable and efficient solution. Businesses can now create engaging videos without breaking the bank, making it an ideal choice for startups and small enterprises. Staying Ahead in the Competitive LandscapeIn a world where staying ahead of the competition is paramount, VEED.io offers businesses a competitive edge. The platform's cutting-edge technology ensures that users have access to the latest features and trends in video editing. This agility is crucial for businesses aiming to create content that resonates with their audience and reflects current market dynamics. 1. Templates and CustomizationVEED.io goes beyond basic editing capabilities by offering a plethora of templates that cater to various industries and themes. Whether it's a product showcase, a tutorial, or a promotional video, businesses can choose from a wide array of templates and customize them to suit their branding. This feature streamlines the creative process, enabling businesses to maintain a consistent and professional image across their video content. 2. Integration with Social Media PlatformsRecognizing the central role of social media in modern marketing, VEED.io seamlessly integrates with popular platforms such as Instagram, Facebook, and YouTube. This integration not only simplifies the sharing process but also ensures that videos are optimized for each platform's specifications. As a result, businesses can enhance their online presence and engage with their audience across multiple channels effortlessly. 3. Real-Time CollaborationCollaboration is a key aspect of many businesses, and VEED.io facilitates real-time collaboration among team members. Whether working on a marketing campaign or creating internal training videos, multiple users can collaborate seamlessly, regardless of their physical location. This collaborative feature enhances productivity and ensures that businesses can adapt to dynamic market conditions swiftly. Success Stories: Businesses Thriving with VEED.ioNumerous businesses have already reaped the benefits of incorporating VEED.io into their marketing strategies. From startups looking to make a memorable first impression to established brands aiming to revitalize their online presence, VEED.io has proven to be a versatile and indispensable tool. 1. Increased Engagement and Brand VisibilityBusinesses utilizing VEED.io have reported a substantial increase in engagement on their social media platforms. The visually appealing and professionally crafted videos capture the audience's attention, leading to higher click-through rates and improved brand visibility. This enhanced engagement contributes to the overall success of marketing campaigns and translates into measurable business outcomes. 2. Cost Savings and EfficiencyBy choosing VEED.io, businesses have managed to significantly reduce their video production costs. The platform's affordability, coupled with its time-saving features, allows businesses to reallocate resources to other critical aspects of their operations. This financial efficiency is particularly beneficial for startups and small businesses looking to maximize the impact of their marketing budget. Conclusion: Elevating Business Promotion with VEED.ioIn conclusion, VEED.io stands out as a transformative force in the realm of video creation for business promotion on social media. Its user-friendly interface, efficiency, cost-effectiveness, and integration with popular platforms make it a must-have tool for businesses of all sizes. As the demand for dynamic video content continues to rise, VEED.io provides a solution that not only meets but exceeds the expectations of businesses striving to leave a lasting impression on their target audience. By leveraging VEED.io's innovative technology, businesses can navigate the competitive landscape with ease, create engaging content that resonates with their audience, and ultimately achieve success in the digital age of marketing. As the fastest and easiest way to make professional-quality videos, VEED.io empowers businesses to tell their stories, showcase their products, and connect with their audience in a way that is both impactful and cost-effective. |
Mike Taylor
Photo-Artist working a personal vision. Archives
April 2024
Categories
All
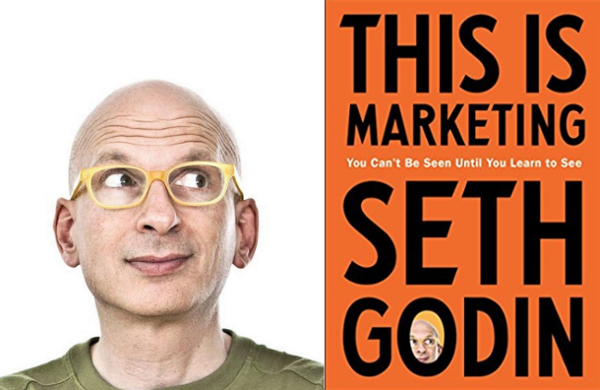
For those of us interested in better marketing techniques, get this book.
Mike Taylor Photo Arts
205Wilson Street
Peterborough
ON
K9J 1S7
Canada
|
 RSS Feed
