
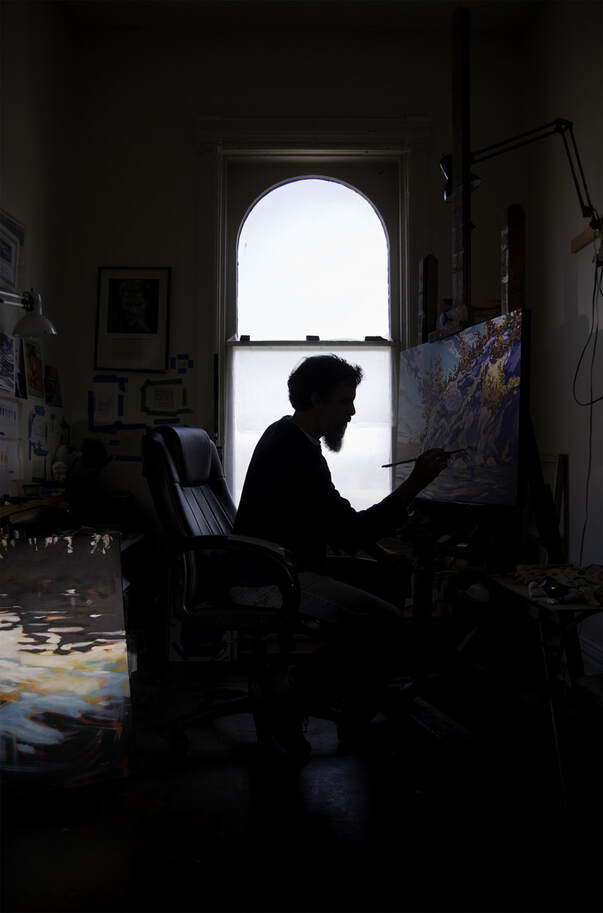
 Portrait photography lighting, in its essence could be deemed successful if the person was shot completely in silhouette. Case in point, the portrait above of local painter, Paul Nabuurs was shot against a large window. No light illuminated him, but two flashes picked out features of his paintings. The window light backlit him, and helped to define his shape People who know Paul, recognize him for his head shape and more specifically for his beard. (he has since moved into a much larger studio space) 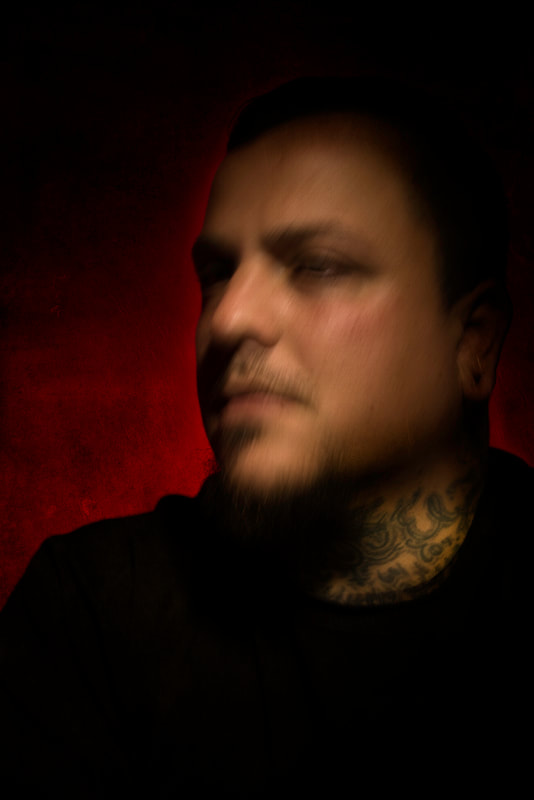 Lighting techniques for illuminating a person, are so varied that entire books have been penned regarding them. Suffice it to say that you could try a different technique every week for your entire career and get a different result every time. I for one am enamoured with the use of LED lights and motion as a way to bring about the feeling of spirit, energy, life. This image of Bruce in my tiny studio incorporates just that technique. We tried different types and speeds of motion with a second light (small flash) to pick out his neck tattoo each time. You will notice that even though his facial features are somewhat blurred, his tatt is relatively sharp. This is the action of the low-output flash with a tight cone mounted on it. I use this technique quite often in my experimental work as I find it helps me express myself and my approach to recording people as they truly are. Living beings, not statues. 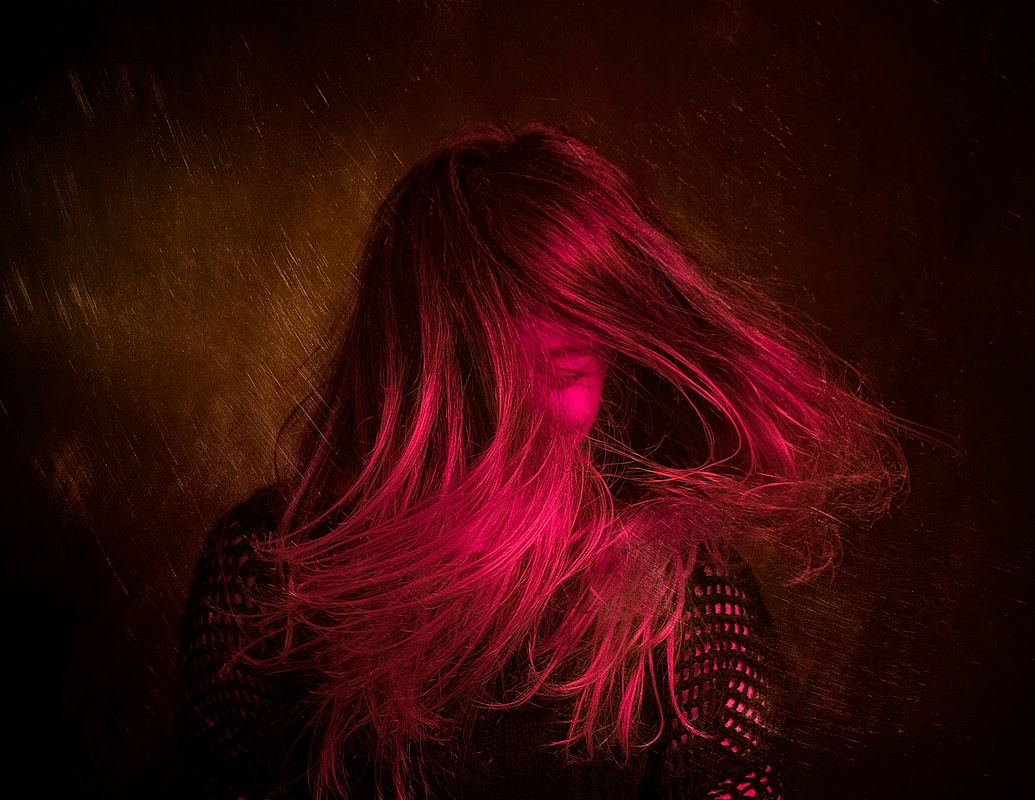 Further to that, being able to express that fact that my subjects are usually living (I hope), I sometimes feel the need to have them move during the exposure. Here, Samara humours me by rapidly flipping her head right to left and back again. A single flash hits the b/g while another flash with a purple gel shoots through an umbrella. Even more, I am holding an LED bulb over camera that is tinted with a mustard coloured gel. The resulting colour mix is beautiful, as you can see. The long exposure of 1/5th second gives me a bit of blur, while the flash freezes some of the image.
Experimenting with lighting is my way of metaphorically adding a new spice to the stew. Giving up and shooting like everybody else, is simply not an option. I encourage you to try it as well. Send me a note and I'll share my list of resources for gels and lights. 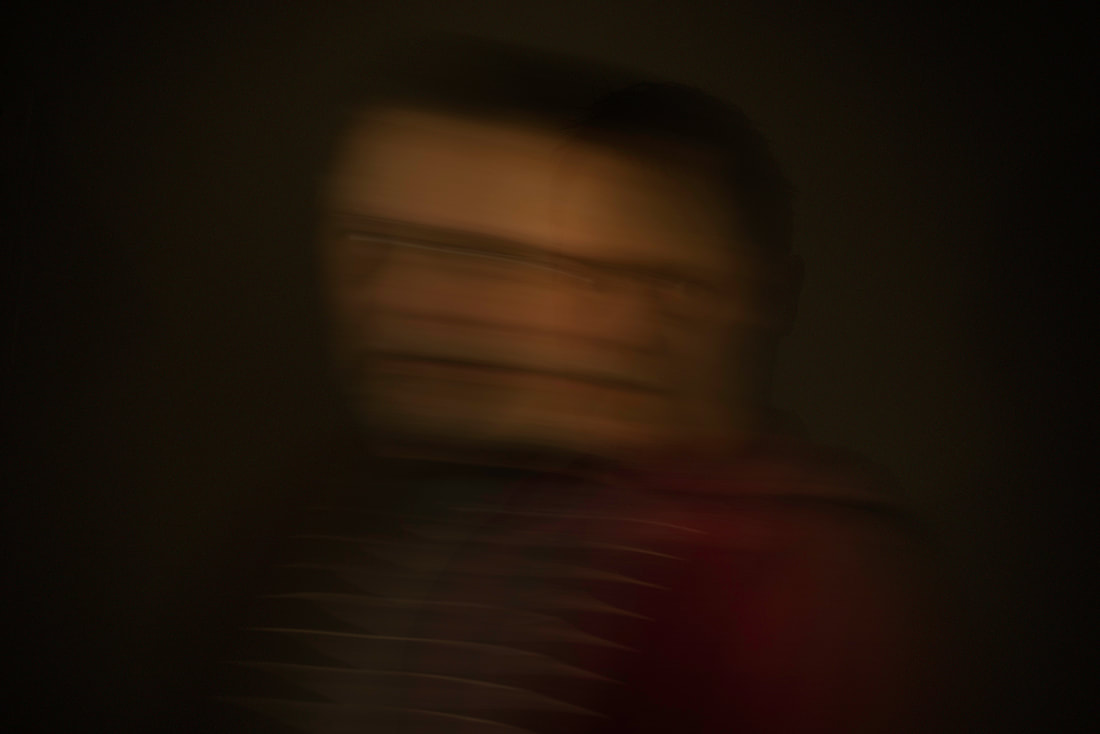 Fast moving self portrait Creating self portraits in your photography is not only healthy, but valuable as you learn to appreciate the experience from the other side of the camera.
One may be most comfortable as the shooter, but that tends to make a person complacent and less able to be understanding of what a portrait subject may be going through. Especially a subject who is rarely in front of the lens. Self portraits give you the valuable gift of empathy. I believe that every photographer who does people portraits should regularly spend time creating self portraits as part of their sensitivity training. I do it every month in my tiny studio. Luckily I can close and lock my door to keep the family out. Having repeated interruptions, whether shooting portraits or otherwise, is an annoying and stress inducing problem with having a home-based studio. Self portraits can be achieved anywhere, really. Just look at all those folks doing "selfies" on the bus, next to a cliff, on a balcony (just inches from death). Making a studied and controlled self portrait is just one step further. It's a "serious selfie". One that matters. It may never see the light of day beyond your camera's LCD or your monitor, but that doesn't matter. You could of course, have your best examples printed and filed in a monthly labeled file folder. At the end of the year, pull them out and analyze and compare the images from month to month. Have you grown as a photographer? How did you change your lighting style or your angle of view? Maybe you will see that you tend to favour a high angle over a low approach to your subject. Making notes of what you are doing is a way of keeping track and seeing first hand how you have grown as an artist. Hopefully you have grown. And that's the point of self portraits. Knowing what the experience is like for the sitter. Giving you a first hand appreciation of having a camera pointed at your face, having lights in your eyes, flashes popping every second or so. One could also go one step further and have a seasoned pro make photos of you too. You could completely give into the situation and not have to think about the photographer's role. Become a true portrait subject. Take direction. Interact with the photographer, who is not yourself. This approach is the ultimate in learning empathy for your portrait subjects. I would highly advise every people photographer to indulge your curiosity and become the subject at least once a month if possible. 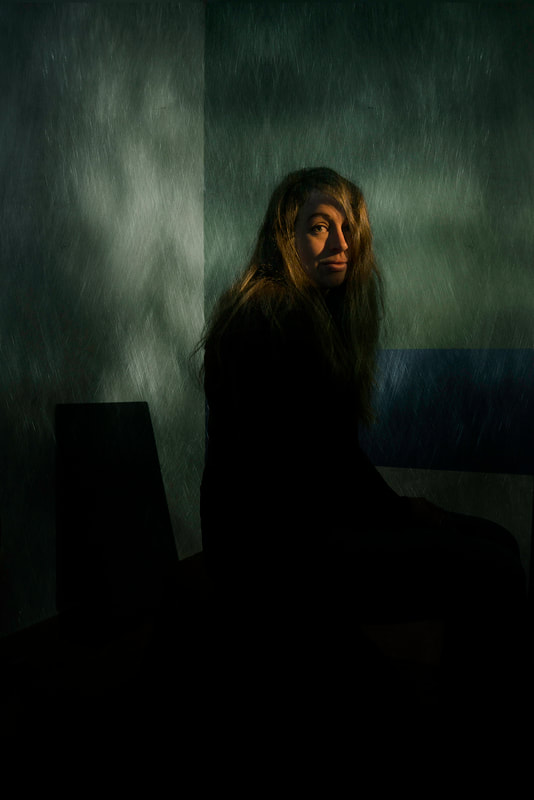 My portrait of Samara Nadav Kander, to me, is much more than your average Joe Blow photographer.
When I look at one of his portraits, I am first taken by the subject of the picture. After this, I consider the technique of how this image was made. Colours, textures, light treatment. It all treats me to a visual celebration that is distinctly the work of this tall, soft spoken Israeli expat. Nadav's work makes the viewer see the subject while appreciating the feelings that inevitably rise to the surface. The portraits are not about cameras and lenses, Photoshop or filters. These images are about emotion, life, feeling, place, origin, character. As he has indicated, his work is metaphorically like chocolate cake. With mustard. I agree. I look to his work when I want to feel something. His images are moments in time being presented for you to respond to in whatever way you deem to be appropriate at that moment. His portrait work celebrates not only the subject, but also the way in which the viewer responds, reacts. He doesn't talk about technique, camera models, lens aberrations, post-processing. None of that matters in his work. His work is that of an artist, with a camera. He is an artist with a camera, creating work that means something. I aspire to be able to create work that is stylistically and distinctly mine, but work that has the power to instigate thought in the viewer, just as his does. Those of us who are privileged to be aware of his work, will undoubtedly be impacted by it. I certainly am. Having learned of his work just last year, I have noticed a difference in my portrait work. A more cohesiveness and work that has a deeper meaning than those of simple portraits. From here, I can only grow. From here, I can become a true artist.  Are polarizers just for landscape pictures?When I am out on a sunny day, shooting an interesting scene, I always have my polarizer and my ND (neutral density) filters packed in my kit. Having these small filters gives me the opportunity to reproduce the image of what I am seeing, so accurately for the viewers that they feel like they were with me too. Sure, much can be done in post-production, using the wonders of accurate modern software (just like one did in the darkroom), but for me, getting it perfect in camera is part of the process. It gives me the satisfaction that I've used the tools at hand to get a better image with minimal manipulation of those tiny little pixels. Shooting landscapes that include water, bright snow, a colour-rich sky, can all be made better and more intense by using your polarizer. There are many instructional videos, books and blog posts that cover the how-to of polarizer use. So finding the best information can be a bit daunting, and sometimes completely incorrect. Tread lightly and be sure to consult worthy resources. For example, the makers of polarizers, or scientific studies that deal with them is probably the best bet. After that, I would consult the words of seasoned photographers who routinely use them. Other than shooting landscapes, another great and sometimes essential use of these tools is when photographing paintings and other shiny artworks. The reason being is that some paintings, primarily oils, are finished with a varnish which preserves the paint and keeps the vitality of the colours strong and impressive. The varnish is highly reflective. This can be detrimental when trying to record the art using lights of any variety. Attaching a circular polarizer on the camera lens, and adding polarizing sheets on the lights, will reduce or remove completely the glare that lights produce as it skims off the shiny varnished surface. By turning the polarizer while previewing the image in the camera, the photographer can see the glare being reduced. It would be important also to note that polarizers will absorb a portion of the light, and may also alter the colour slightly. Accommodations will have to be made with respect to these conditions. In my work, I always use a Color Checker Passport to make sure my colour and exposure are accurate. Since each camera colour bias is unique, it is important to do this for each camera body you may use, and for each lighting condition. If you are shooting with LED lights, be sure to do a colour profile for your LED lights from month to month as bulbs change colour over time. The same goes for incandescent, fluorescent, flash etc. Each bulb has its own colour temperature. I would avoid mixing lights to photograph art because of this sort of thing. While these filters can be expensive, if you are using them repeatedly and take care of them, it would be a worthy investment as it will save you time in post-production. A circular filter should average about $80 depending on size, and the sheets for lighting run about $70 for a 17x20 inch sheet. If you are shooting with flash, this is much more than required. You could cut pieces of polarizing film to fit your flashes, and sell the remainder to make a profit. I'll leave that up to you though. At the end of the day, quality polarizers make for better pictures and saved time.  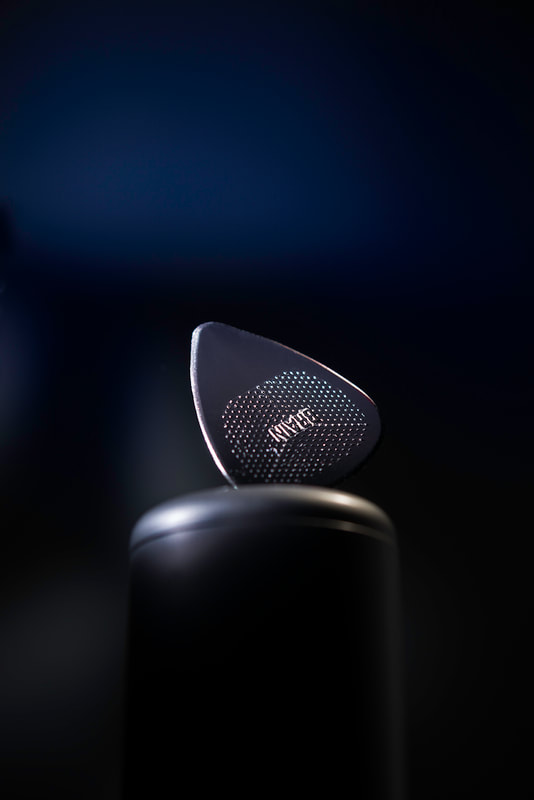 Photographers in my opinion, who stop #experimenting and playing with lighting, subject matter and different approaches, will probably at some point feel stagnant and lacking motivation. From many sources I've heard that lack of creativity is a big problem amongst photographers who have been at it for a considerable time. The solution, or perhaps one solution, is to constantly be trying new things.
I like to grab a subject that I normally wouldn't be photographing and put it to the test. I think of a scenario or problem, and figure out a way to shoot the subject so that it stands out from how we would normally see it. Picking the appropriate lighting, the angle, the background and all that sort of thing comes next. Usually after researching 30 to 100 images of this sort of subject matter, I will see a similarity amongst the images and how they were approached. From there, I will look at a potential opposite approach. Take for example, this guitar pick. For the most part they (picks) are photographed with a broad open light while laying on a flat surface. The camera is either straight over head or at a 45 degree angle. There are no props, no styling, not colour influence or creative lighting. The shots are boring and repetitive. In my approach I wanted the pick to be revered and respected. So I put it on a pedestal and lit it in a dramatic fashion. I also dropped the camera down low, to show the pick as something unique and worthy of notice. The goal is to set the image apart from the status quo and make people stop and appreciate it. After all, for a commercial picture, isn't that the ultimate goal? To be noticed? The point of the project is to use your brain and all your experience in a different way. Doing so will keep you from falling into a creative rut, and will ultimately serve you well in all of your photography work. Don't be afraid to dedicate some time to stretching your creative brain cells. They need exercise just as much as your belly. I know mine does. So have at it. Go find a subject that you wouldn't normally work with and build a scenario that forces you to use different skills, equipment, approaches etc. Make images just for yourself. It will always benefit you in the end. Exploring a niche, with light and colour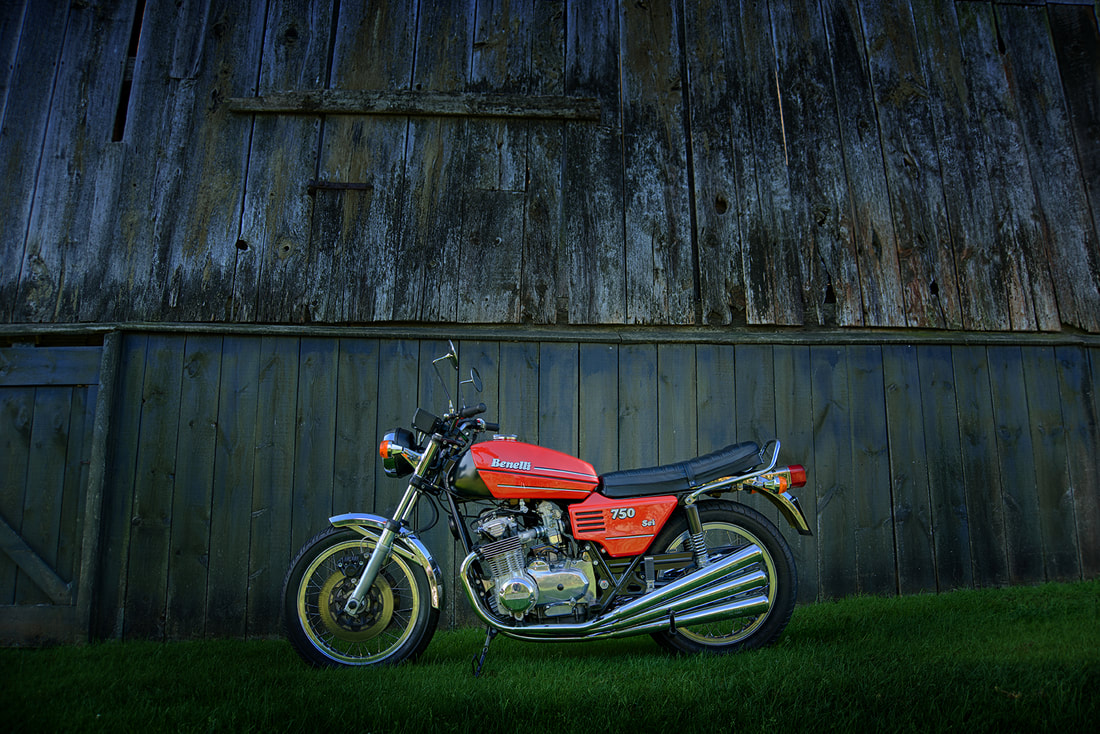 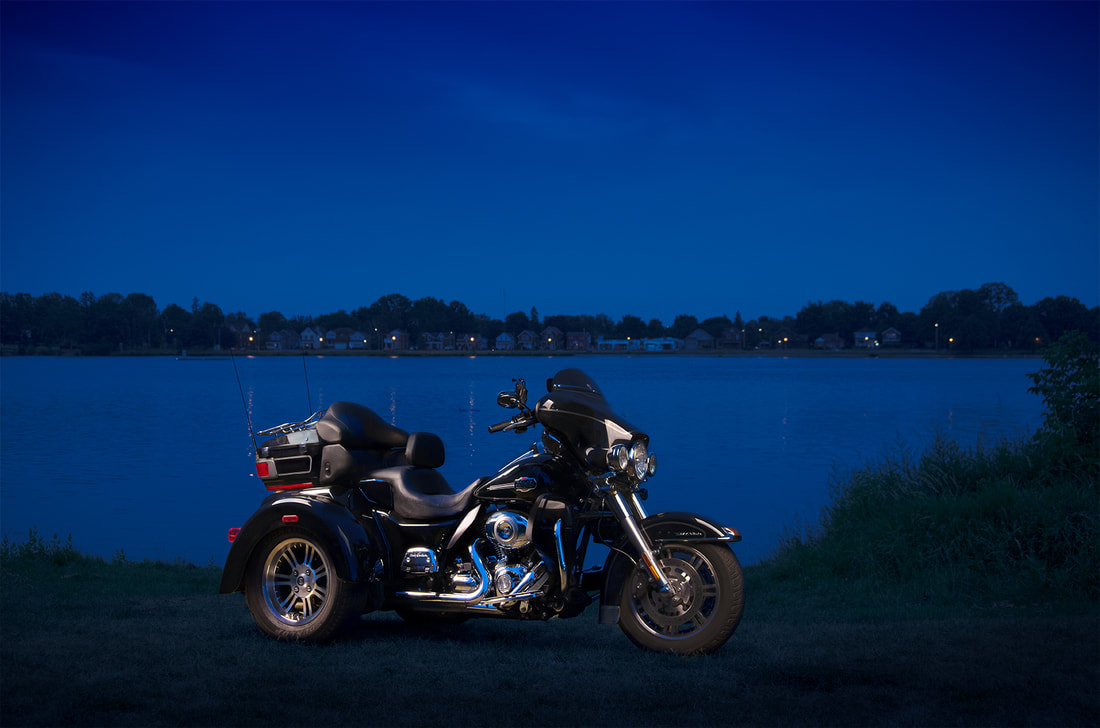 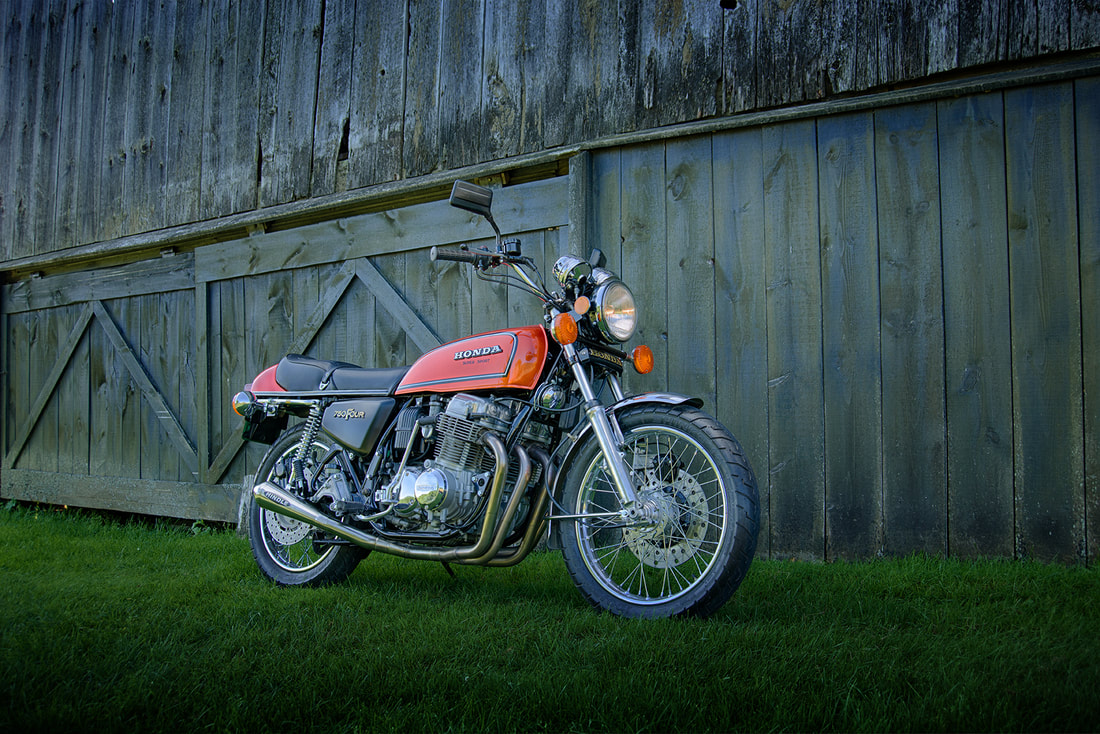 Colour and light, pretty well everything you seen in a photograph has these two elements. Well, you might say that I am wrong when it comes to b&w images and I would have to take issue with that.
Black is basically the complete lack of colour and white is the complete inclusion of all colour. So, in that sense, b&w images are also colour images. Light, necessary to show shape and texture, along with colour are the leading components of this new project I have taken on. I wanted to approach a specific subject matter and use both colour and light to illustrate the character of the motorcycle. I thought of the motorcycle because of its iconic status throughout modern history. Motorcycles have been used for a myriad of purposes, all over the planet by every type of person. Motorcycles are revered with status, shunned with thoughts of danger and death, held in high regard by those seeking to break records and get from where they are to where they wish to go. They are polished to a glistening shine, driven through foot deep mud holes, dismantled and reassembled, upgraded, customized, talked about, and held as the centrepoint of exclusive groups all over the world. Riders love their bikes. They love to talk about their bikes, where they travel on them, what they've achieved during rides, what they avoided during rides and more. My project pulls the energy from the rider and presents it to the viewer. The viewer has the opportunity to briefly join in on the story and gain a hint of what draws the rider to the life of a motorcycle rider. I have just begun my journey. At the moment I have no idea where it will take me or when/if it will have a completion date. I do however plan to learn and experience as much as I can in the process. Watch for future updates. PS: If you have an amazing bike that should be photographed, please connect. How important is the image you put out into the world for your personal brand?I would suggest that the image you use to promote your brand is extremely important. It's right up there with the ability to breathe. In my opinion. If you are anything but a recluse or a hobbit, you are probably communicating with other humans on a regular basis. Maybe communication itself is your business. Maybe you are a team leader or a manager of a large department. Everyday you communicate with any person anywhere, you are communicating your personal brand. When your image is viewed in any form, you are communicating your personal brand. Viewers are forming an opinion about you whenever they see your image. You have no control over that. However you do have the ability to influence what they think of you, what opinion they form and consequently how they may react to meeting you face to face. This is where a quality-driven photographer can make things go either positively or negatively in regards to the first impression your portrait creates. A talented photographer, who listens to the person in front of the camera will be able to bring out the authenticity required to get that amazing shot. The brand building portrait. Now for some data. On occasion I will take a few of the images that I have created and submit them to public opinion. I'll upload them to a polling site that shares them with the general public who then rate each image based upon a specific criteria. Usually I will let the poll run overnight to gather a decent number of votes, but other times just a few hours will be sufficient. I recently did just that with these 3 portraits. You will see that each ranks fairly high in each of the 3 criteria. What this tells me is that what I am accomplishing with good photography, proper interaction with the client and constant practice is working for both myself and my clients. 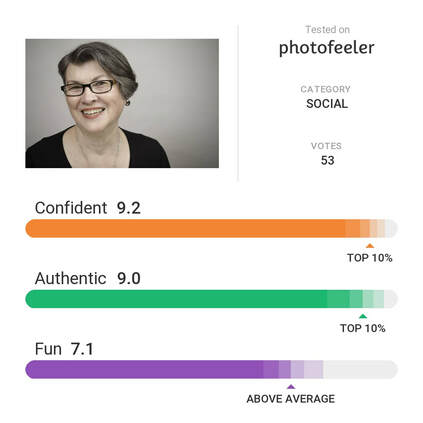   Your personal brand can move your forward or keep you at a standstill. Your portrait is part of that brand. Consider your portrait as an investment in you. It can pay dividends but you have to invest wisely. Make this year the year to invest well in your personal brand with a quality portrait.
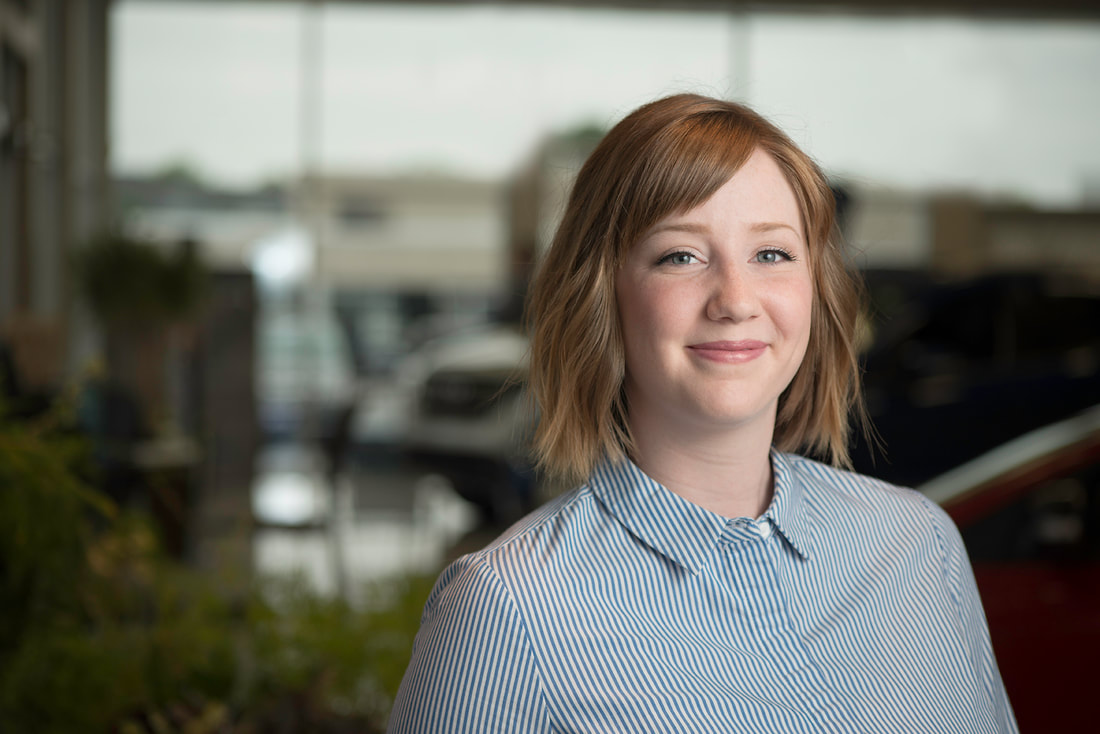
I guess you could classify this post as a mini-rant, because that is how I feel whenever I see a "Meet the Staff/Team" web page and almost wretch at the images posted. Granted, on rare occasions the images are acceptable and on even more rare occasions they are exceptional. Here's my 10 tips for putting together a cohesive and professional set of staff/team headshots.
  Why is monitor calibration important anyway?
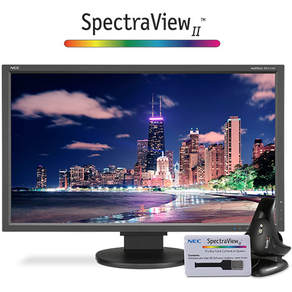
Great question. Glad you asked. The simple answer is that each sensor, each lens, each monitor, each printer etc. can render colours differently. Your camera monitor may display jpg images with a colour values at one level, while the computer screen that you review it on may render them at a completely different level. Then when you go to print that beautiful flower image, the printer may reproduce the values different yet again. Printing and the calibration of printers, is an entirely different conversation. So let's stick with the monitor at the moment. When a monitor is properly calibrated, it is set up to display all the colours it is able to display. The screen is not too bright, so that the colours are washed out. Not too dark so that they lack richness and saturation. Zooming in to pixel level, the viewer can delineate between colours easily. Colours show their full potential. They show how the image was captured on the sensor (or film) and don't lack for anything. Accuracy is the name of the game. If for example you were to photograph a person with the intention of sharing the image, or printing it, it is highly possible that an uncalibrated monitor would display the tones incorrectly. Skin could show up greenish, the bright blue sky could be dull and lifeless. Lacking of saturation and contrast where in reality it existed in abundance. It also means that retouching time would probably be longer than necessary. Adding more stress to the retoucher (perhaps that is you). Calibration is an important aspect of an effective workflow that starts with the image capture. How calibration is achieved can be a long discussion. There are tools that are designed specifically for the task. Prices very. The process is rather simple, but takes a little bit of time. No matter. It's absolutely worth it, and once it's done you only have to follow up every two weeks or so (in most cases). Good quality monitors designed for the graphics and photography markets, will have highly detailed adjustability so that you can fine tune your monitor to suit your work environment and uses. A quality calibration tool will work with these adjustments in order to make sure your calibration is right on the money. Some of the more high quality monitors available are from manufacturers such as: Eizo and NEC. For calibration tools, look at those by X-Rite, Datacolor and others. Calibrating your monitor is the start to a better workflow and better results. You WILL see the difference. Taking a chance in your portrait work can be a daunting step, especially when you are just starting out in the photography world. I know that when I was a beginner, I was intimidated by all those buttons and dials not to mention the fact that I had a living person waiting patiently for my to say "say cheese". Believe me, I felt the pressure. I think that for a person to be a successful photographer, no matter how you define that, they must go beyond the technical aspects of making a portrait. A skilled photographer is so comfortable with the mechanics of making an image, that it is second nature. They are thinking more about the subject, lighting, positioning, and ultimate goal. All that camera "stuff" is assumed. Case in point, let's look at this image. I shot this for a personal project on musical instrument makers. Richard here, makes Irish flutes. His business partner (who wasn't available) makes Irish drums, bodhrans. Beforehand, Richard talked about where he spends part of his time in the production process, his workshop that used to be a garage. He admitted that he has never had a car in here. It's always been a workspace for him. He also pointed out that the graphic on the exterior is his adaptation of an old Irish fairytale creature, and that he uses it on all his branding material. To get this image, I had to position two lights. One inside the shop and one outside a small window that he is facing. The exterior was lit by a cloudy sky. Once I figured out the mechanical aspects of getting the lights to fire, (optically triggered), I just had to position him properly and wait for the sun to submerge a bit to pull it all together. I was no longer thinking about the camera and flashes once I had established that I was getting the response I wanted. Before we entered the space, I had a half-hour chat with Richard about his process and his history. Having this time to become familiar with each other, made the shooting part all the more comfortable. He relaxed and played, I snapped away. I made him a framed 18x22 print that he graciously accepted and loves. The point is to go beyond the technical before you can truly be a creative photographer. You will be more successful when you think more about the subject and what you are attempting to express. This all comes with practice and with continued observation of the world around you. I highly advocate the study of art in all forms. Painting, dance, figure studies, sculpture and other forms of creativity and expression. Get your butt down to the local galleries, museums, book shoppes. Whatever it takes. When you find arts that inspire you in any way, ask yourself why they get your creative juices going. Keep a record of some sort and draw from that record in your portrait work. It will serve you well. 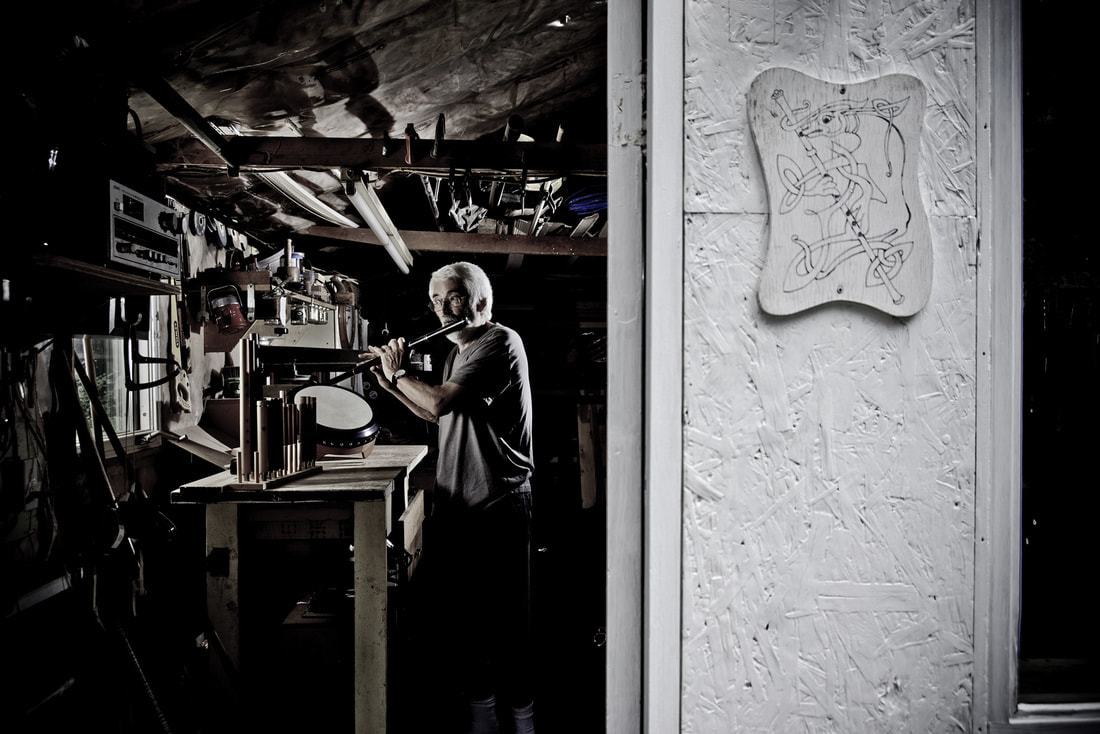 |
Mike Taylor
Photo-Artist working a personal vision. Archives
May 2024
Categories
All
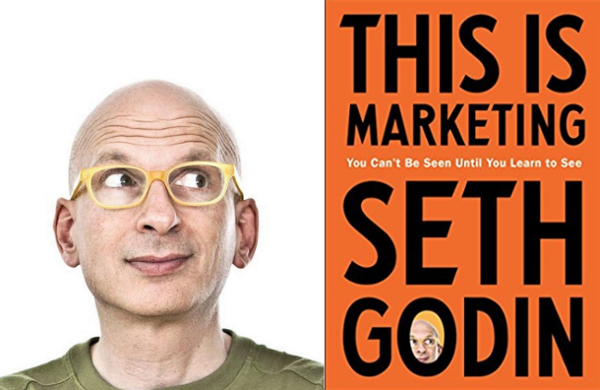
For those of us interested in better marketing techniques, get this book.
Mike Taylor Photo Arts
205Wilson Street
Peterborough
ON
K9J 1S7
Canada
|
 RSS Feed
